Oren Ben-Kiki.
redistributed unchanged.
| Copyright (C) 2002 Oren Ben-Kiki. |
|
This document may be freely redistributed unchanged. |
There are more ways to solve the Rubik's cube and guides to describe them than I can count. This guide is different in that it focuses on a solution that is practical: easy to follow, remember and perform.
Most guides either describe operations in terms of algebra and "conjugate operators" (hard to follow) or as a long magical list of face moves (hard to remember).
This guide avoids both problems by introducing a middle level of "basic operations". Each employs three basic face moves to achieve an intuitive effect (easy to remember). The solution operations consist of combining two or at most three such basic moves together in a way that makes sense (easy to understand).
Most guides ignore the issue of convenience of performing the operations. As an extreme example, one guide I've seen included an operation that rotated the back face of the cube. This means you either need to contort your hands around the cube or re-orient it in the middle of a complex operation. Operations on the front face are only marginally better in this respect.
This guide uses only four face moves and one slice move. All of these can be easily applied without re-orienting the cube in the middle of an operation.
Most guides are long (several pages) and therefore hard to use as a reference without taking your hands off the cube.
This guide also comes in a compact version that can be printed in one page. This is a plain ASCII file (no tiny fonts) so it is readable by anyone using any hardware and any operating system, anywhere and at any time. The compact version is self-contained and complete, and is useful as a reference guide and as an aid for memorizing the solution.
Most guides start with a cube oriented such that one of its faces is facing the viewer. If you try this in practice, you'll note you can only get a good view of two of the faces (typically the front and the upper one).
This guide starts with a cube oriented such that one of its edges is facing the viewer. This means you get a good view of three faces (typically the upper, left and right faces).
Many guides describe solutions that try to minimize the number of moves. This requires memorizing many specific operations for many specific cube configurations. And then trying to figure out which of them applies to your cube.
This guide describes how to solve the cube layer by layer, using a small number of simple, incremental steps. This approach is generally accepted as being the easiest and most natural, but you won't win any speed competitions using it.
This annotated guide is written as a tutorial for understanding the compact guide. Once you go through the tutorial, you will find the compact guide to be easier to use as an aid for solving a cube and for memorizing the solution or refreshing your memory about a specific step.
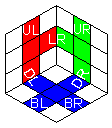
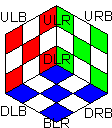
The guide contains an ASCII image of three faces of the cube, using it to name several of its faces, edges and corners. Keep in mind that the name of each part of the cube depends on the way you hold it. In many cases, to perform some operation you'll first need to orient the whole cube first.
Also note that not all pieces of the cube are given names. Don't worry about it. In each step of the solution, you'll only have to worry about the part of the cube you can see at one glance, which means three faces at most.
|
|
Faces |
||||
       ULR
      / | \
    UL  |  UR
   /    |    \
ULB    LR     URB
 |      |      |
 |  L   |   R  |
 |     DLR     |
 |    /   \    |
 |  DL     DR  |
 | /         \ |
DLB     D     DRB
   \         /
    BL     BR
      \   /
       BLR
|
 |
 |
 |
||
|
Edges |
 |
Corners |
|||
 |
 |
||||
Instead of using abstract names, the guide uses visual notation for each operation (as much as that is possible in ASCII). Using this notation, the operations can be specified in a terse and intuitive manner.
Each of these operations rotates one of the cube faces. The guide describes them in terms of corner to corner rotation. As one corner and some edges aren't named (are hidden from view in the cube chart), they are specified using ?. The names (and mnemonics) of each operation are based on the way they effect the "front most" corner or edge.
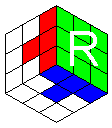
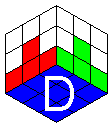
Starting from a cube with its edge oriented towards you, you'll find that by rotating the whole cube a bit to the left, it becomes easy to rotate the left face with your left hand, and similarly for the right one. Likewise, the upper face is easy to rotate with the left hand, and the lower face with the right hand. Since the same four face moves are used over and over again, you'll find that "muscle memory" makes them very easy to perform, compared with solutions requiring you to rotate the "front" face (or the "back" face - shudder).
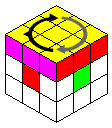 |
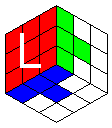
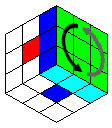
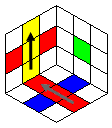
{ = ULB <- ULR <- URB <- ??? = U left
Mnemonic: The { points left, and is rounded (somewhat) like the letter U. |
|||
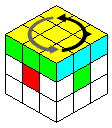 |
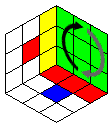
} = ULB -> ULR -> URB -> ??? = U right Mnemonic: The } points right, and is rounded (somewhat) like the letter U. |
|||
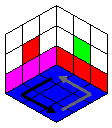 |
< = DRB <- DLR <- DRB <- BLR = D left Mnemonic: The < points left, and is angular like the Greek letter delta. |
|||
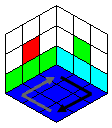 |
> = DLB -> DLR -> DRB -> BLD = D right Mnemonic: The > points right, and is angular like the Greek letter delta. |
|||
 |
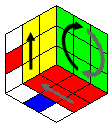
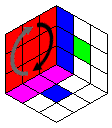
v( = ULR -> DLR -> DRB -> URB = R down Mnemonic: The ( describes the arc
performed by the ULR corner. |
|||
 |
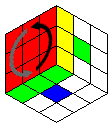
^( = DLR -> ULR -> URB -> DRB = R up Mnemonic: The ( describes the arc
performed by the DLR corner. |
|||
 |
)v = ULR -> DLR -> DLB -> ULB = L down Mnemonic: The ) describes the arc
performed by the ULR corner. |
|||
 |
)^ = DLR -> ULR -> ULB -> DLB = L up Mnemonic: The ) describes the arc
performed by the DLR corner. |
|||
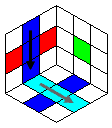 |
v = UL -> DL -> BR -> ?? = C down Mnemonic: The v points down. |
|||
|
||||
 |
^ = BR -> DL -> UL -> ?? = C up Mnemonic: The ^ points up. |
|||
|
There are four basic ways to manipulate the ULR corner. It turns out that all corner operations (and some of the edge operations) can be expressed in terms of these motions.
As these operations are so basic to the solution, they are assigned special shorthand notation of their own, instead of being specified each time as a set of face operations. This makes it much easier to memorize (and understand/feel) the solution.
 |
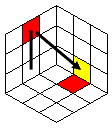
)> = )v > )^ = ULR -> DRB = ULR to right Mnemonic: The ) describes the arc
performed by the ULR corner. |
|||||
|
||||||
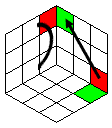 |
)< = )v < )^ = ULR <- DRB = ULR from right Mnemonic: The ) describes the arc
performed by the ULR corner. |
|||||
|
||||||
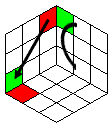 |
<( = v( < ^( = DLB <- ULR = ULR to left Mnemonic: The ( describes the arc
performed by the ULR corner. |
|||||
|
||||||
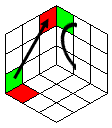 |
>( = v( > ^) = DLB -> ULR = ULR from left Mnemonic: The ( describes the arc
performed by the ULR corner. |
|||||
|
There are three basic ways to manipulate the UL edge. It turns out that all remaining (edge) operations that aren't covered by ULR movements can be expressed in terms of these motions.
Again, as these operations are so basic to the solution, they are assigned special shorthand notation of their own, instead of being specified each time as a set of face operations. This makes it much easier to memorize (and understand/feel) the solution.
 |
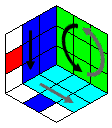
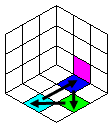
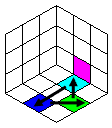
|> = v > ^ = UL -> DR = UL to right Mnemonic: The | describes the motion
performed by the UL edge. |
||||||
|
|||||||
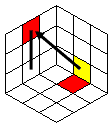 |
|< = v < ^ = UL <- DR = UL from right Mnemonic: The | describes the motion
performed by the UL edge. |
||||||
|
|||||||
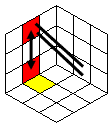 |
|>> = v > > ^ = UL <-> DR = UL exchange Mnemonic: The | describes the motion
performed by the UL edge. |
||||||
|
Once you have mastered the basic operations, solving the cube becomes reasonably easy to do (and remember). The solution consists of the following 9 steps:
Orient the cube so that your chosen first layer is the upper face. You now need to bring the four corners of the proper color to their positions. There are two cases you need to be able to handle:
Corner in D : ULR from.
If the corner is in the down face, orient the cube so its proper place is at the ULR corner. Rotate the down face until the corner is at either DLB or DRB. Then employ the "ULR from left" or "ULR from right" operations. The corner will now be in place. In two out of three cases, it is possible to also properly orient the corner in the process, by choosing the appropriate "ULR from" variant.
Corner in U : First, ULR to.
If the corner is in the upper face, but at the wrong position, turn the cube so it is at ULR. Then employ either "ULR to left" or "ULR to right". The corner will now be in the down face. Bring it up to its proper place as described above.
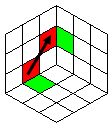
You can "twist" each corner in one of two directions.
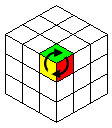 |
Twist ULR clockwise : >( )> Mnemonic: Think of moving the DLB corner to DRB via ULR. Along its way it twists ULR in the direction it travels (clockwise). |
|||||
|
||||||
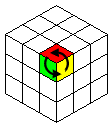 |
Twist ULR widdershins : )< <( Mnemonic: Think of taking the DRB corner to DLB via ULR. Along its way it twists ULR in the direction it travels (widdershins). For those of you who don't read Terry Pratchet - 'widdershins' means 'the other way', or in this context, counter-clockwise. |
|||||
|
Orient the cube so that your chosen first layer is the upper face. You now need to bring the four edges of the proper color to their positions. There are three cases you need to be able to handle:
Edge in D : UL from/exchange.
If the edge is in the down face, turn the cube so its proper place is at the UL edge. If the edge needs to be flipped, rotate the down face until it is at DL, then employ the "UL Exchange" operations. Otherwise, rotate the down face until the edge is at DR, then employ the "UL from right" operation. The edge should now be in place (and properly oriented).
Edge in U : First, UL to.
If the corner is in the upper face, but at the wrong position, turn the cube so it is at UL. Then do "UL to right". The edge will now be in the down face. Bring it up to its rightful place as described above.
Edge in middle : Adapt step 8.
Step 8 describes how to rotate three edges in a single face without moving anything else in the cube. To adapt it, rotate the upper face so that the edge you want to move will be adjacent to its target position. Orient the cube so both are at the down face and apply step 8 to bring the edge to its target position. Then re-orient the cube and rotate the upper face back to its proper position.
It is usually possible to bring the edges to the first layer so they will already be oriented properly. However, sometimes they start at the middle layer, or at the right place in the upper layer, and are initially flipped. Or maybe you used the "wrong" way of bringing them to their proper position. Either way, you now need to flip them in place. Orient the cube so that the first layer is the upper one and the edge you want to flip is in the UL position, and do either of the following:
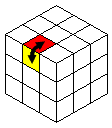 |
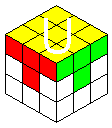
Flip UL : |>> > |< Mnemonic: Flipping the edge down and then bringing it up without a flip will cause it to be flipped "in place". |
||||||
|
|||||||
|
Flip UL : |> < |>> Mnemonic: You can also do the same thing in reverse, first bringing the edge down without a flip and then flipping it up. The end result is the same - flipping "in place". |
||||||
|
Having a reverse way to flip an edge will prove vital in step 9.
At this point your first layer is complete. The second layer contains only edges. You need to position each in its place. This time, take care that each edge is brought to place in the correct orientation (if it isn't, use one of the following operations to bring another edge to its place and try again).
These are edge operations that are caused by corner motion, which is rather surprising. This makes the mnemonics a bit of a stretch.
 |
DR -> LR : > )< < >( Mnemonic: Think of moving DR "away" to the right, then bringing it "back" to place by doing the "ULR from right" operation. Now all that's left is restoring ULR from the other direction. |
||||||||||
|
|||||||||||
 |
DL -> LR : < >( > )< Mnemonic: Think of moving DL "away" to the left, then bringing it "back" to place by doing the "ULR from left" operation. Now all that's left is restoring ULR from the other direction. |
||||||||||
|
At this point your second layer is complete. This leaves just the third layer to be solved. In the first layer you could "just do things". Trying to do the same for the third layer would make a mess of the first and second layers. The solution is to make use of the fact that while doing an operation messes up these layers, doing its reverse fixes the damage. The trick is to apply the operation to one part of the third layer and its reverse to another part. This achieves some effect in the third layer while leaving the first and seconds layers intact.
At any rate, the first step is to position the third layer corners. You can get away with using just two operations (that are also easier to remember) that rotate between three third layer corners. However, I'm also giving here a way to exchange two adjacent corners. It can save a lot of moves, so it is worth memorizing even if it is somewhat magical.
Note that for the three-corner rotation, the cube must be oriented so the third layer is the right one. For the two-corner exchange, the cube must be oriented so the third layer is the down one.
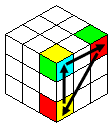 |
ULR <-> URB <-> DLR : <( { >( }
Mnemonic: To rotate ULR to URB, take it to the left and then bring it back up to its new place. |
||||||||
|
|||||||||
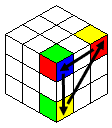 |
URB <-> ULR <-> DLR : { <( } >(
Mnemonic: To rotate URB to ULR, make it ULR, take it to the left and then bring it back up to its new place. |
||||||||
|
|||||||||
 |
(3rd is D) DLB <-> DLR : <( )> >( > > Mnemonic (not a very good one, I'm afraid): Think of the second move, ULR to DRB, as the motion that does the trick, as long as ULR is put out of the way first and restored afterward. It isn't how this really works, but it makes it a bit easier to remember. |
||||||||
|
|||||||||
This is rather simple once you get the hang of using an operation and its reverse operation. To twist any pair of corners, orient the cube so the third layer is the upper face, and the first corner to twist is at ULR. Now do the following steps:
- Twist ULR as in step 2.
You can twist it in either direction. This, of course, messes the first and second layers.
- Move other corner to ULR using {/}s.
That is, by rotating just the upper face.
- REVERSE twist ULR as in step 2.
You must rotate the second corner (now in ULR) in the opposite direction from the first one. This rearranges the first and second layers.
- Re-orient U layer using {/}s.
You need to return the original ULR to its place, again by rotating just the upper face.
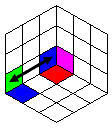
This works in a similar way to rotating a corner. There, by moving a corner from one place to another, a different corner was rotated. Here, by moving one edge in a path around the cube, the positions of three other edges are rotated (exchanged). Magically, nothing else is effected.
 |
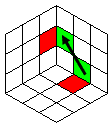
BL <-> DR <-> BR : |> > > |> Mnemonic: The final step actually takes UL from the left, so the operation is to move UL right and take it from the left. Along its journey, UL somehow drags BL in the same direction, causing the rotation. |
||||||
|
|||||||
 |
DR <-> BL <-> BR : |< < < |< Mnemonic: The first step actually takes UL to the left, so the operation is to move UL left and take it from the right. Along its journey, UL somehow drags DR in the same direction, causing the rotation. |
||||||
|
All that is left now is to orient the third layer edges. Flipping any pair of edges is simple, because we know how to flip and reverse flip an edge from step 4. To do so, orient the cube so the third layer is the upper face, and the first edge to flip is at UL. Now do the following steps:
- Flip UL as in step 4.
It doesn't matter which variant you use at this point. This messes the first layer.
- Move 2nd edge to UL using {/}s.
That is, by rotating just the upper face.
- REVERSE flip UL as in step 4.
You must flip the second edge (now in UL) using the reverse way from the first one. This rearranges the first layer.
- Re-orient U layer using {/}s.
You need to return the original UL to its place, again by rotating just the upper face.
That's all there is to it. When trying to memorize the solution, focus on ULR and UL operations. For example, it is much easier to remember "move UL to the left, then take it from the right" than memorizing the resulting series of 8 face operations.